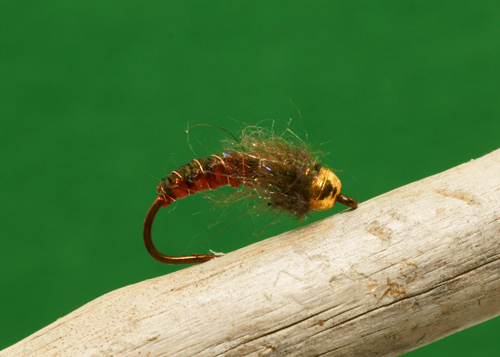
Polish Anchor Nymph
By Phil Rowley
Hook: Daiichi 1120, #6-#12 (Weighted)
Thread: MFC 6/0 or UTC 140, Color to compliment dorsal color of fly
Rib: Fine gold, copper or silver wire
Body: Stretch or Embroidery Floss, Woven Together Using a Shuttle Weave
Thorax: Arizona Synthetic Dubbing, Color to Compliment Woven Body
Bead: Tungsten, Gold, Copper or Black (#6-#8-1/8” Bead, #10 7/64” Bead, #12 3/32” Bead)
Tying Note: Vary the dubbing and Stretch Floss colors. Some of my favorite body combinations include dark olive over light olive, dark olive over rusty brown, brown over rusty brown, brown over light olive. If weaving Stretch Floss proves challenging use embroidery thread instead.
When it comes to using nymphs in moving water most do not use enough weight to get their flies near the bottom. Presentation depth is always more important than pattern choice. Split shot is the most common weighting option. Adding split shot takes time and if you aren’t careful you can damage your leader or tippet. Split shot also has the annoying habit of flying off the leader during the cast. I used to use split shot all the time but my philosophy has changed. I now use weighted patterns. By tying a pattern in a number of different weight configurations I can explore various depths and current flows. Weighted flies are also faster to change than adding or subtracting split shot.
Using patterns of varying weights jumped to the forefront during the 1989 World Fly Fishing Championships. Polish fly fisher, Vladi Trzebunia put the world on notice with his mastery of non-indicator contact nymphing and his unique slender woven weighted flies. Vladi used heavy woven nymphs resembling free living caddis larva as anchors to drag his dropper flies down to the bottom.
Polish nymphs are weighted using varying combinations of brass or tungsten beads and lead or lead substitute underbodies. A single pattern can be tied in a variety of combinations. A tungsten bead with 15 wraps of .020 lead, a tungsten bead with 15 wraps of .010 lead or just a tungsten bead. Serious nymph fly fishers use grain scales to measure their patterns so they know the specific gram weights of each configuration. With experience they gauge what weight fly will be the best choice for the presentation challenge facing them. The sparse woven body common to Polish nymphs also helps the fly plummet through the water.
Polish nymphs are tied on heavy wire curved scud pupa hooks. Weighted scud hooks ride bend down point up reducing hang-ups and subsequent fly loss as the pattern bounces and skips off underwater obstructions.
Post cold war Poland was starved of fly shops. Polish tyers used common inexpensive materials including yarn, sausage skin even latex condoms. Original woven body Polish nymphs used contrasting colored yarn.
Embroidery yarn is an excellent forgiving body choice and when weaving for the first time. Other woven body materials include wire and a personal favorite, Stretch Floss. Stretch Floss can be tricky to weave due to its elastic nature but by maintaining steady pressure and a bit of practice it creates smooth fast sinking bodies. Using the strands in pair’s verses a single strand of each color also eases weaving. Winding embroidery yarn onto empty spools or using spooled yarns such as Uni-Yarn or Uni-Stretch in conjunction with a wide barrelled bobbin aids the weaving process by keeping the materials under consistent tension.
The shuttle weave is the most challenging aspect of tying a Polish nymph. Once you have the technique mastered it is amazing how fast you can create contrasting woven bodies featuring dark backs and light underbellies. The shuttle weave also lends itself to other patterns including stonefly and dragonfly nymphs.
A smooth foundation is critical to a tight woven body. As Polish nymphs often have lead foundations care must be taken to build up a smooth tapered underbody. I use larger flat 6/0 thread. Twisted threads build up bulk and do not work well. Floss and Uni-Stretch are also good underbody choices. Once the body and rib materials are in place and the underbody is complete tie off the thread so it does not interfere with the weaving process.
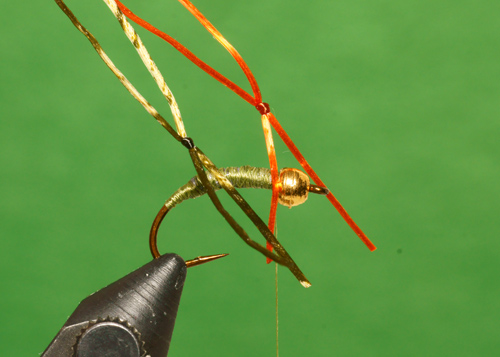
Keeping the body materials apart by tying the body materials along each side of the hook eases weaving. As Polish nymph bodies are woven point up be cognisant of what side of the hook the different colored body materials are tied on. Tie in the lighter ventral material along the near side of the shank and the darker dorsal color along the far side.
Now the fun begins. Invert the hook and re-position the vise so the eye of the hook is pointed straight at your chest. Make sure the hook is horizontal so the materials don’t slide off. Take the light material in your right hand, the darker material in your left. Do not let go of the materials. Once the shuttle weave process begins if you let go the materials the body will unravel.
Here is how to shuttle weave:
1) Hold the darker material in your left hand down and below the hook.
Bring the lighter material across the top of the hook so it is perpendicular to the underbody. Your right hand is now on the left side of the fly.
2) Bring the darker material up and over the lighter material and then under shank to the right side of the hook. Hold it in the same horizontal perpendicular manner as the lighter material. The darker material should now be looped over the top of the lighter material along the left side of the shank.
3) Bring the lighter material straight back across the top of the shank so both hands are now on the right side of the hook. Hold the lighter material perpendicular to the hook. Bring the darker material up and over the lighter material towards you on the right side of the shank.
4) Finish the first shuttle weave by bringing the darker material back under to the right side of shank. Your hands should be back in their original starting position holding the materials perpendicular to the hook shank. Repeat this weaving process to complete the body.
The biggest barrier to the shuttle weave is hand coordination. Weave slowly. Think about what you are trying to do and what color goes where. When weaving a Polish nymph remember the darker material goes under the hook, the lighter material goes over the top. The reverse is true if you are weaving a fly hook point down.
Once the woven body is complete hold all the materials tight in one hand. Locate your bobbin. Pinch the tag end of the tying thread between fingers of your material holding hand and reattach the tying thread. Tie off the body materials and trim the excess. Review your handiwork. Your first attempts may not be up to snuff, but with practice your results will improve.
Woven body flies provide an element of contrast. An important pattern characteristic trout respond to. With practice you will be producing a myriad of body combinations at an alarming pace.
Tying Instructions
To view the rest of this article, please login or join now for free!
|


