Thread: 6/0 or 140 Denier, Grey, Olive, or Tan
Body: Deer Body Hair, Natural or Dyed Spun and Clipped to Shape
Legs: Hen Pheasant, Cock Pheasant or Mallard Flank Fibers
Head: Deer Body Hair, Natural or Dyed, Spun and Clipped to Shape
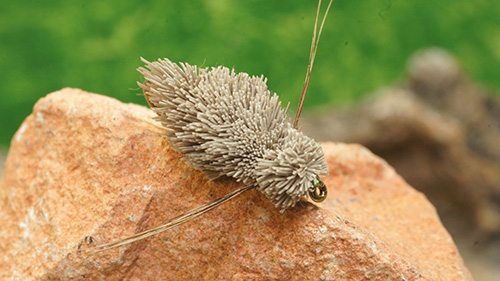
One of the best dragon nymph imitations is Jim Crawford’s Gomphus. Although technically not a Gomphus imitation, Gomphus or Gomphidae are most commonly found living in slow moving sections of rivers and streams, there is no disputing this pattern’s success.
The spun and clipped deer hair body of the Gomphus allows for pedestrian retrieves coupled with sinking lines to mimic the plodding nature of the nymph as it crawls along the bottom. The Gomphus features a tightly spun, packed and clipped deer hair body providing natural buoyancy to keep the fly just above the bottom.
Selecting the correct deer hair is critical. Soft, spongy to the touch, deer hair spins and flares easily. When using dyed deer hair inspect the hair closely as the dying process can dry out and stiffen the hair making it unsuitable or difficult to spin.
Deer hair’s natural grey color is a perfect match for most Sprawler nymphs that this pattern was designed to imitate. I also tie Gomphus patterns in other colors such as olive. You can also color the body and head using permanent markers. Tie your Gomphus patterns using natural deer hair and color them at the vise or better yet, on the water to match the natural nymphs.
Another option involves blending different colors of deer hair. My first book, Fly Patterns for Stillwaters featured Dunc’s Carey, a spun and clipped dragon nymph designed by Duncan Laird. Duncan mixed different colors of deer hair together in the same manner you would blend dubbing. Blending a variety of different deer hair colors allows you to create a natural mottled body.
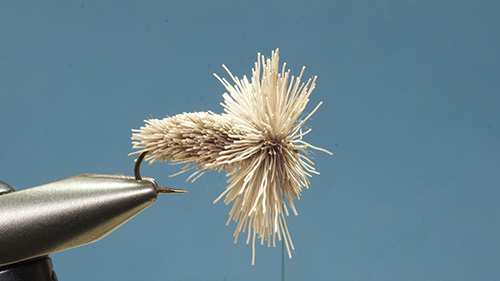
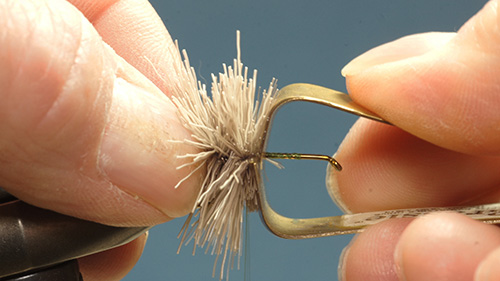
Spinning deer hair can be both challenging and frustrating. Remember, deer hair is a ‘hands on’ material that always needs to be under control. In order to properly spin deer hair the short fibres and underfur must be removed after a clump has been trimmed from the hide. Removing the short fibres and underfur is easily accomplished by pinching the hair by the tips and then plucking the underfur and short fibres from the butts. Fine tooth moustache or pet flea combs also work well. As the tips aren’t used for the body and head of the Gomphus removing them prior to spinning reduces the trim time and the chance of the hair catching on the hook point as it rolls around the shank.
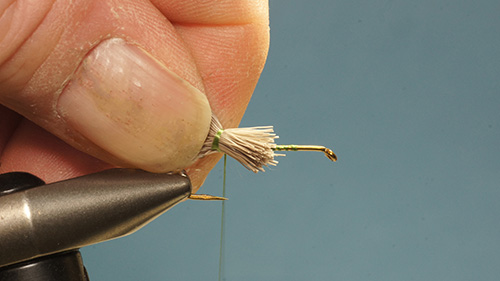
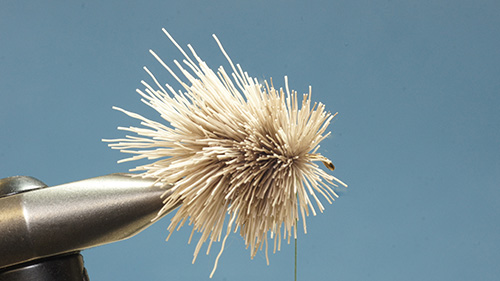
To form the body begin at the rear of the hook by laying a deer hair clump across the shank on roughly a 45-degree angle so there are equal amounts of hair on either side of the hook. Place two loose controlled wraps of 6/0 or stronger thread around the clump. Apply thread pressure on the third wrap. As the hair begins to flare continue increasing thread tension allowing the hair to rotate around the hook. To secure the hair, continue winding the thread in the same location until it stops spinning. Support the deer hair from behind, pack the deer hair back into position using your fingers or a hair packer. Continue spinning and packing clumps of deer hair along the shank to form a tight dense buoyant body.
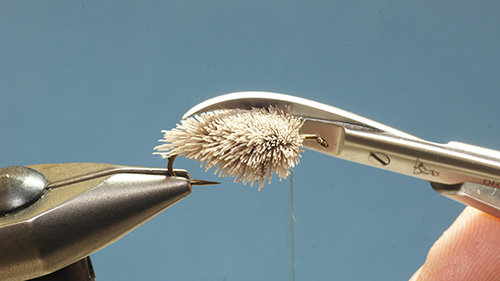
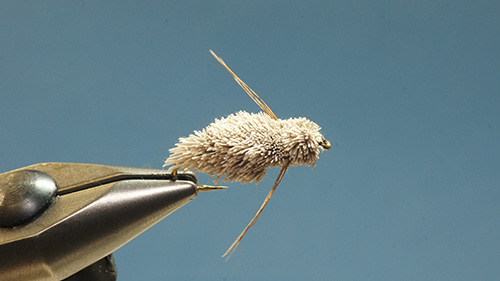
Once the body is complete trim it to shape. Begin by trimming the hair flush along the bottom to ensure an unobstructed hook gape. Trimming can be done in the vise or by tying off the tying thread and removing the hook from the vise. Next, trim the top of the body flat. Finally, trim the sides and tip of the body to a rounded shape to match the squat spider-like shape of the natural nymphs.
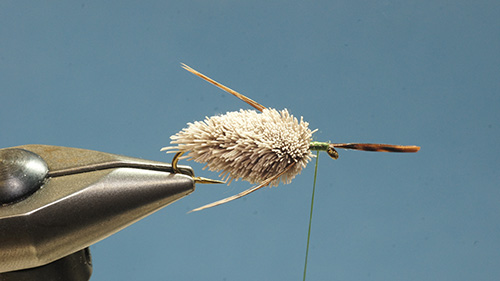
With the body trimmed to shape tie in the legs. Common leg materials include natural hen pheasant and ringneck pheasant tail fibers or dyed mallard flank, teal or gadwall. The legs should flow down the sides, tips even with the end of the body. With the legs in place form a triangular shaped spun and clipped deer hair head to complete the fly. Pinching the legs alongside the body and exercising a level of care when trimming the head ensures you don’t accidently amputate the legs.
A cross section of Gomphus patterns in sizes #8 and #10 is a must for any stillwater fly box. Especially when dragon nymphs are on the move when they migrate towards shore to crawl out and emerge, when prospecting new waters and during the summer and fall months.
1) Cover the rear ¾’s of the hook shank with tying thread. Keeping the front quarter of the shank bare provides a proportional goal post to ensure enough room remains, after forming the body, to build the head. Trim a pencil diameter sized clump of deer hair from the hide. Remove the underfur and short fibers. Trim the tips of the prepared deer hair clump. Lay the prepared and trimmed clump across the shank on a 45 degree angle. Place two loose controlled wraps of thread around the deer hair. As you make the third wrap begin increasing thread pressure. As the hair begins to flare release the deer hair so it spins around the shank. Continue winding the tying thread in approximately the same spot through the deer hair as it spins around the shank. Once the deer hair stops spinning add a few more wraps for added security.
2) Prepare a second clump of deer body hair. Spin it onto the shank in front of the first clump. Once the second clump is secure use your thumb and forefinger or a hair packer to push and pack the two clumps together. Support the rear of the first clump so you don’t accidently push the deer hair back out of position. A tight well packed body provides buoyancy keeping the fly off the bottom reducing the risk of snagging or fouling.
3) Continue forming the body by spinning pencil diameter sized clumps of deer hair onto the hook until the rear three quarters of the shank is covered. Remember to pack the spun deer body hair tight together after each clump to form a dense buoyant body.
4) Trim the body flush, both the top and bottom. Make sure the hook gap is unobstructed by the body so the finished fly can successfully hook fish. Body trimming can be done either in or out of the vice.
5) Shape the body by trimming the sides to a curved shape, mimicking the natural profile of a Sprawler nymph. Curved scissors are an asset when shaping the body.
6) Tie in two sets of legs, six to eight fibres per set, just in front of the body so they trail down the sides, tips even with the end of the body.
7) Form the head by spinning one to two clumps of deer hair, as space allows, over the front quarter of the shank. Push and pack the hair back tight against the body and legs. Build a neat head whip finish and apply head cement.
8) As with the body, trim the head flush top and bottom. Trim the sides so the head is somewhat square across the front and angles back to the body in a somewhat triangular shape similar to the natural nymph. Use care when trimming to avoid accidently removing some or all of the legs.